Lady of Lyme
  • Blog
  • Shop
  • About
  • Products I Love
    • Supplements & Meds
    • Makeup & Skincare
    • Food & Diet
    • Apps & Organization
    • Gift Guides
  • Resources
    • Symptoms/Resources
    • Lyme Vocabulary
    • Printables
    • Books & Reading
  • Features
  • Testing
  • Contact
  • Treatment Info
    • DesBio Treatment Facts
    • My Treatments
    • Treatment Blog

How To Make A DIY "Emergency Kit" with Essential Oils + A Giveaway Featuring Young Living Oils!

1/15/2018

10 Comments

 
I am a huge lover of essential oils. I was introduced to them about 4 years ago, and at the time I knew next to nothing about how they work or what they do. I was dealing with chronic pain, anxiety, digestion issues, insomnia etc and when I was told that these oils could help in those areas of my life I was willing to give it a try. Within my first day of receiving my Young Living kit and using PanAway to relieve an awful stomach cramp, I was made into a believer. Since then I use essential oils on a regular basis. I have 5 bottles on my bedside table within reaching distance at all times, and you can find oil bottles scattered all throughout the house.

On top of having a giant oil collection, I also am someone who has some slight OCD when it comes to things being organized. If things are not exactly tidy and labeled and in their correct spot I get very stressed out. I love my oils, but I often find myself moving a bottle to a purse and forgetting it's there. Or I give my parents some bottles for the car and they leak or get left behind. I knew I needed to get more organized with my oils, but truthfully I didn't know where to start.

Got Oil Supplies reached out to me and asked if I would be interested in any of their essential oil storage and organization items. I of course immediately responded with a resounding yes! I particularly had my eye on their Travel Kit, because one thing I have been wanting to do for a long time now is have an essential oil kit set up and put away in case of emergency. We had a tornado scare about a year ago and as I sat in my basement waiting for the danger to pass I began to think about being more serious with having a kit I could grab in a moments notice which would have things I might need in a pinch. So today I'm going to show you how to put together an Emergency Kit, as well as a keychain Travel Bag and a roll on Bottle & Bag Set. Let's get organized! I'm also giving away an Emergency Kit + a bottle of Young Living Tea Tree oil, so read on to get details below.

Creating an Emergency Kit with Essential Oils

Picture
Picture
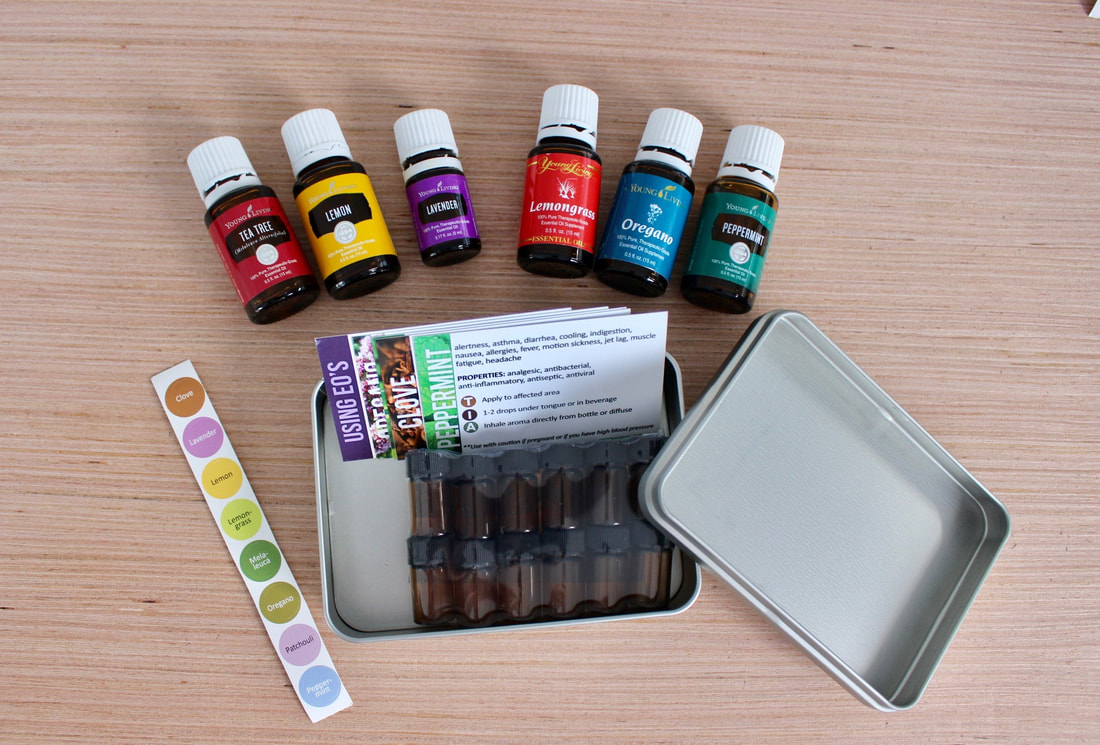
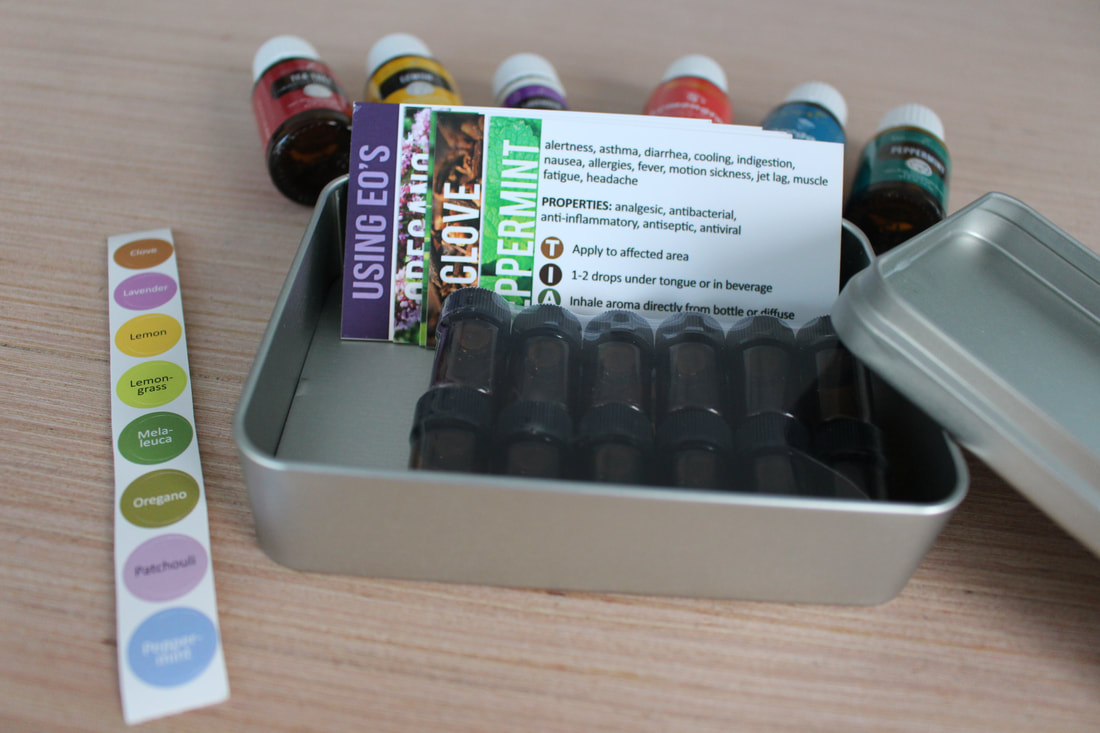
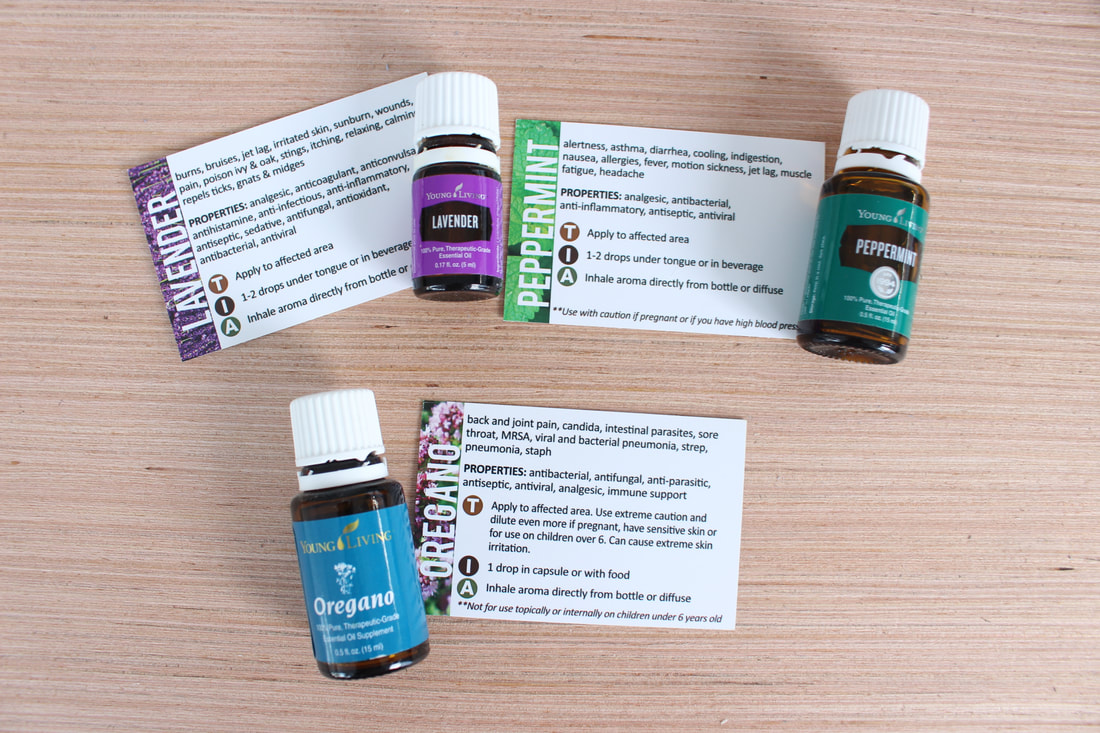
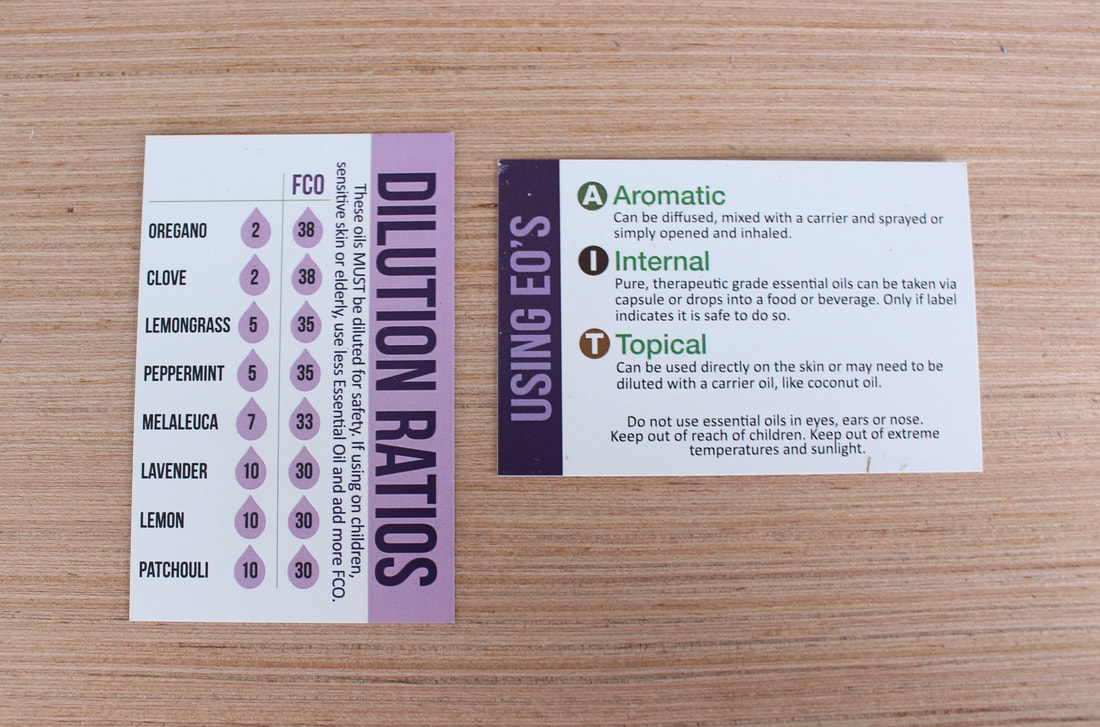
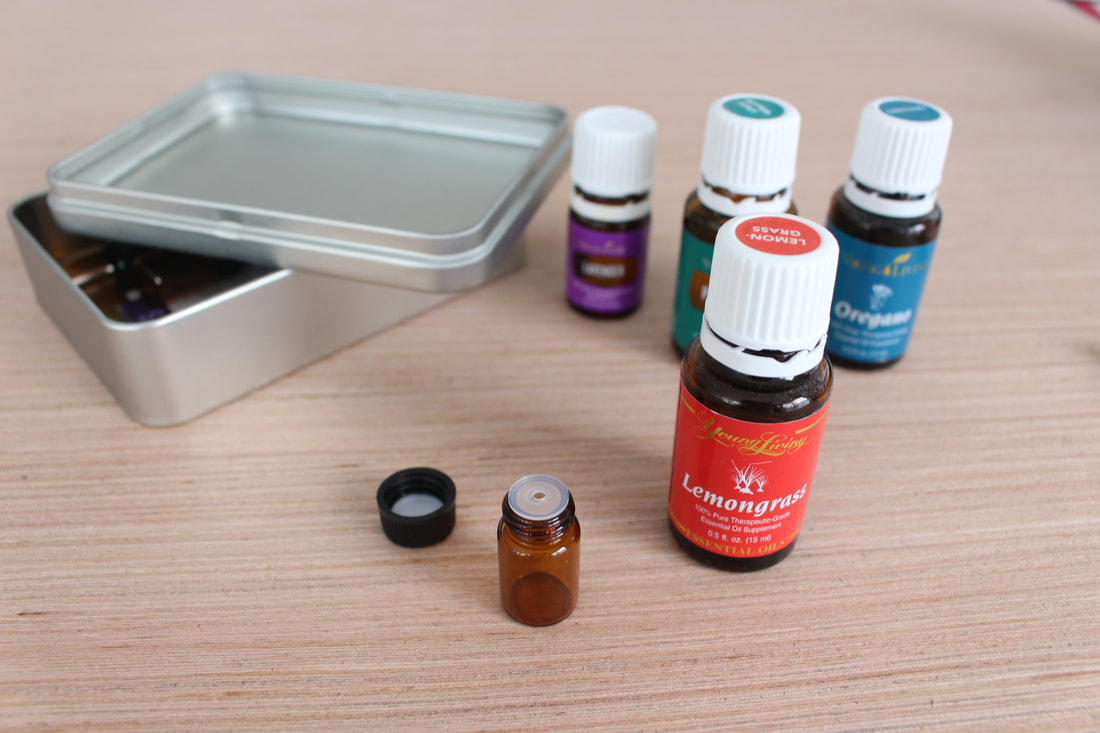
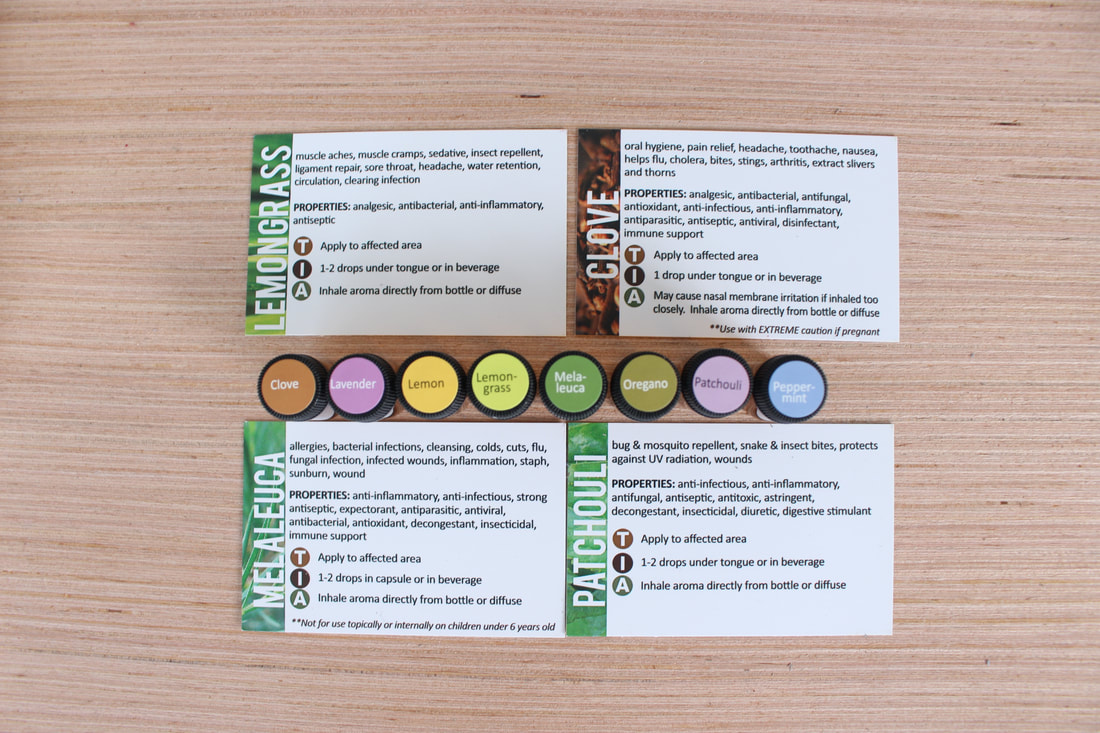
The Emergency Kit comes with 12 small bottles, 8 stick on labels, info cards discussing how to use each oil, and a metal tin to keep it all organized. The kit comes with 8 pre-printed labels, so this leaves you with 4 extra bottles to put other oils of your choice into. I also found the printed instruction cards to be very useful because they include info on how each oil can be used. For example it has a guide telling you if the oils can be ingested or not, if it can be used during pregnancy or not, and also what properties it has. I find myself often googling if a certain oil can be used internally or not, and I always forget which oils are "hot" oils, meaning that they need to be diluted down. The cards are my favorite part of the kit, because truth be told I thought I knew everything about these oils, but it turns out I actually had a lot to learn!
Picture
Picture
Once I got everything opened up I collected my needed oils and got to work. You have two choices when you start to fill up the bottles, and that is whether or not to pre mix and dilute or just use pure oils. If you go ahead and dilute in the small bottles provided then you will be all set to use it as is. But if you fill it up with straight essential oil then you will need to keep a dilution oil on hand as well. This choice is completely up to you!

I didn't want to mix up the oils so I did them one by one. I opened the small bottle, took off the stopper, filled it up and then immediately put the proper label on. It was actually still quite quick, and that way there was no confusion as to what anything was. It took me about 10 minutes in total to get everything filled up and labeled, and here was my final result.

Picture
Picture
Voila! It was really easy to make and now I have this put away next to the First Aid Kit in my home. You can also use this as a travel kit, and create it to take with you on vacation or gift it to someone who travels a lot.

Creating A To-Go Roll On Kit with Essential Oils

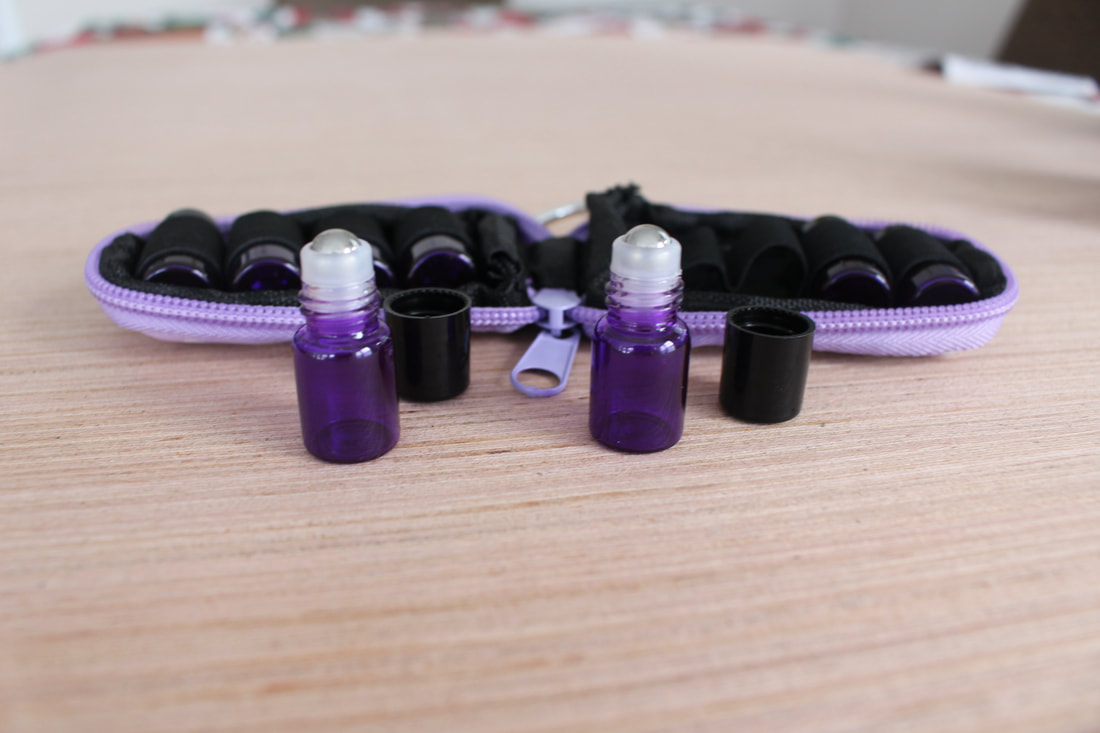
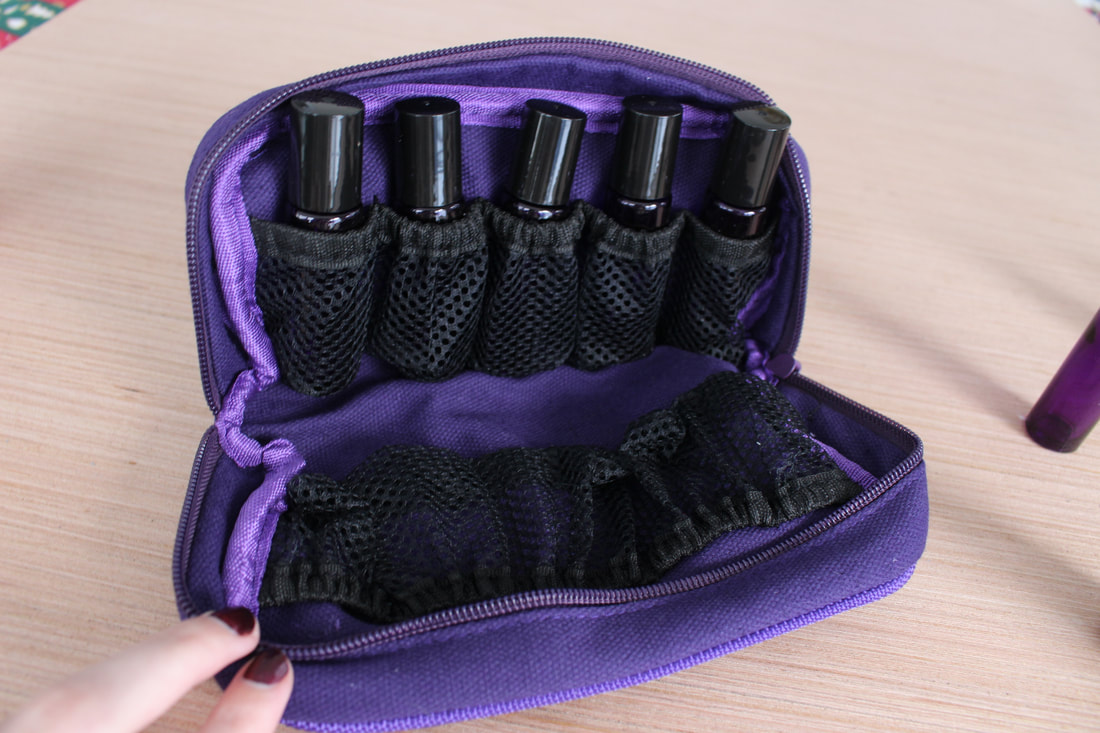
My next project was to create a key chain travel bag which contains 8 mini roll on vials which nicely zip up into a small bag that attaches to your key chain. You could also keep this in your purse since it folds up quite small and portable (approx 4" x 3" x 1"). This kit is useful if you want to have some oils on hand at all times, and keeping it on your key chain ensures that it will be with you anytime you leave the house.
Picture
Picture
For these I chose oils I desperately need to have on hand throughout the day. I use Digize religiously to help with all my digestive issues. I have Crohn's and prior to that I struggled with stomach difficulties for many years. I use it directly on my stomach for cramps and nausea, as well as to help with my digestion after meals. I also chose to put Valor and Joy into my kit because those two oils help immensely with anxiety. I apply Valor to my wrists and I put Joy directly over my heart. Those two together can instantly lift my mood and calm my mind.

I picked Thieves because it's currently cold and flu season, so I put that on the soles of my feet diligently to help my immune system. My whole family starts each day by making sure we put Thieves on and having it in a roller bottle is very convenient for on the go. I chose some other oils not shown in the photos such as Peppermint because I sniff it to curb nausea, and a blend of Peppermint and Wintergreen for pain relief. This kit is now ready to go and can be easily transferred to the keys of whoever might need it.

I also created a larger at home grab and go kit with roller bottles. I love roller bottles because everything is already pre-mixed and ready to be used. It also leaves your hands clean because the roller bottle does all the work, and I love this for times when I just can't get myself to move out of my bed.

Picture
Picture
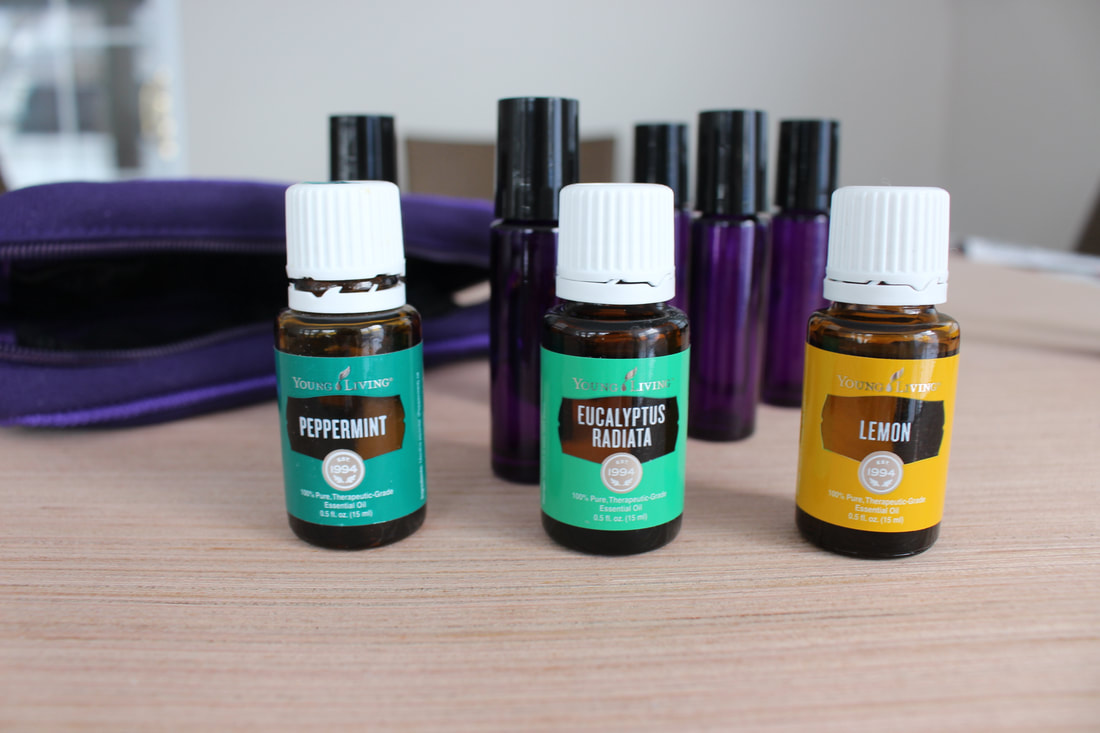
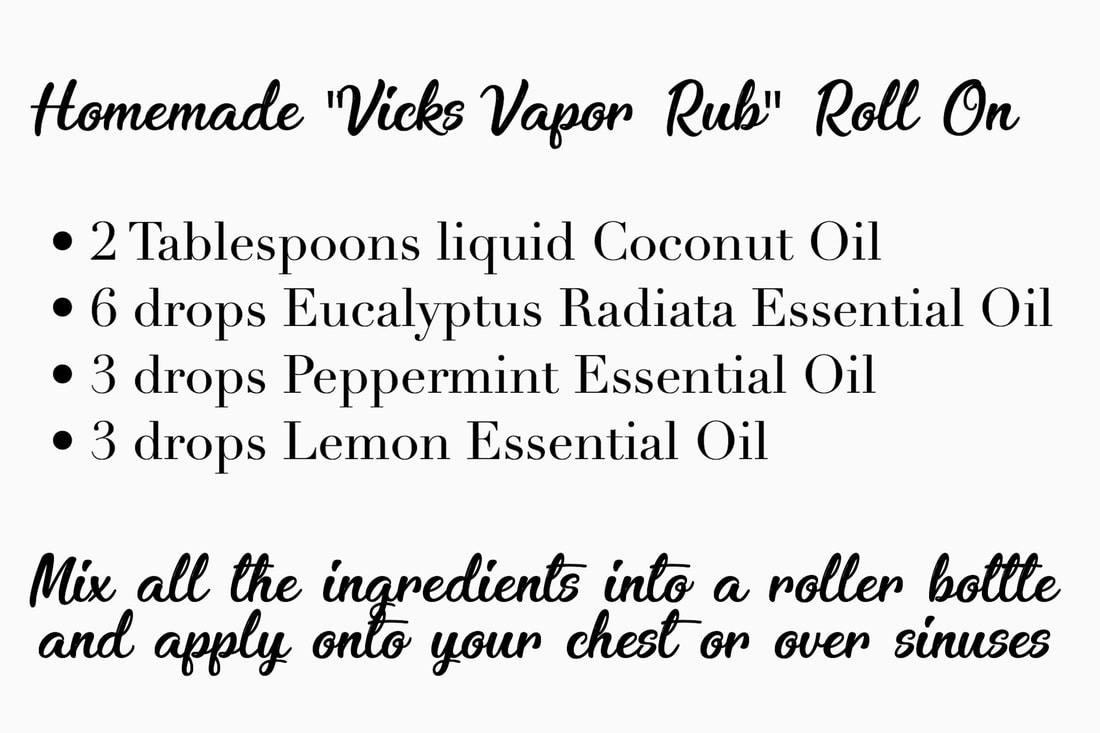
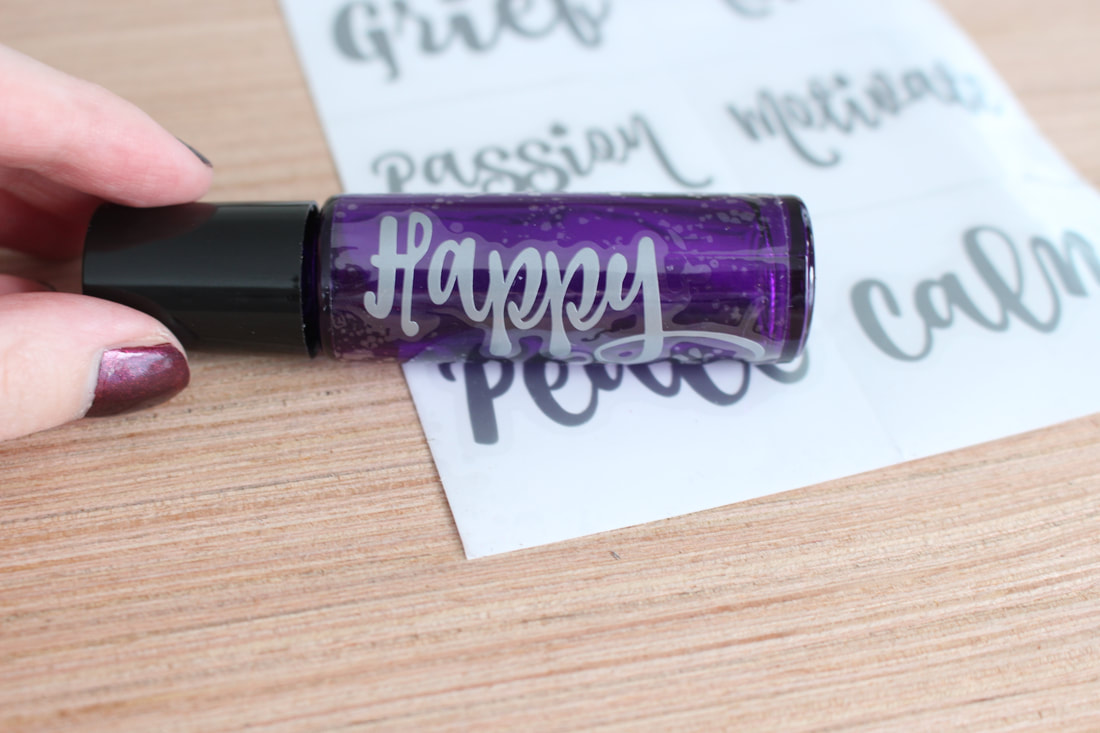
I put together a kit with a few different mixtures that I can keep on hand in my bedside table drawer. One of the recipes I made was a copycat Vick's Vapor Rub that you can easily roll onto your chest for congestion. I got a 12 pack of the purple glass bottles and they hold 10ml each. So I made a few different combinations which I then put into the little slots in a carrying case and I was all set. I also labeled a few with these cute little stickers, such as my "Happy" roll on which contains the Joy oil.
Picture
Picture
So there it all is! I got very organized and it felt so satisfying to have everything put together and ready for when I need it. Got Oil Supplies has a ton of stuff on their site to help you get organized, and browsing their site inspires me to do even more. They were so kind to send me these items free of charge, but even better they were kind enough to give me an extra Travel Kit to giveaway so you that you can make your own Emergency Kit for yourself!

The Giveaway is for a Travel Kit (which I used for the Emergency Kit) and a 15ml bottle of Young Living Tea Tree Oil, which is just a little bonus I decided to throw in to help you get started on creating your kit. You can enter the Giveaway below!

If you are inspired to get organized yourself you can use code LADYOFLYME10 for 10% off your entire order on GotOilSupplies.com

xoxo,
Christina

Win An Essential Oil Travel Kit + Young Living Tea Tree Oil
10 Comments

Comparing & Trying 5 Self Tanners (with Photos): St. Tropez, Vita Liberata, and More. What's The Best Self Tanner for Chemical Sensitivity & Chronic Illnesses?

1/5/2018

0 Comments

 
These reviews are not paid for, not sponsored, and all items were purchased with my own money. No one asked me to do this, I just decided to chronicle my search for a perfect self tanner. I hope you enjoy!
If you want to read reviews of a few different self tanners from the eyes of someone with Multiple Chemical Sensitivities and allergies, you have come to the right place! If you struggle with sensitivity to smell or a chronic illness, you have also come to the right place. I have all of the above, and I tried out 5 different self tanners. I am here to review them all one by on and show you photos of it all.

There are a few things you should know about me right off the bat. I have MCS (multiple chemical sensitivities) and a lot of allergies. When I try any kind of new skin product there are a few big hurdles to jump through: 1. The smell: It can't have any added fragrance and it can't have a strong scent at all 2. The ingredients: it can't be full of stuff I can't pronounce because 9 times out of 10 I will react to it. Also, even some "natural" ingredients may have not so natural roots (i.e aren't organic) and the pesticides can for sure give me a rash or a migraine etc so I have to be really choosy. These are the 2 big criteria I have and are mainly what I will be judging on, plus of course how the tan itself looks & wears. I also have a chronic illness, and that means that things like showers are very exhausting for me, and a ton of work. It also means that standing for long periods of time is often a no-go. I am going to mention my experiences based on someone who is using pretty much all their energy for an entire day on this. I did all of these trials in the span of like 4 months or so. Also, please note that "self tanner smell" I speak of is just a stinky smell, not a chemical smell. Much like eggs or cooked broccoli. It isn't pleasant but it's not chemical in nature. 

So now that we have that squared away, let's jump into it. I'm doing this review because when I looked for MCS/allergy friendly self tanner reviews online I found 0 results. I understand that most people who are sick with illnesses don't typically prioritize being tan. I get it. For the last 4-5 years I hid from the sun because I was too sick, and I don't do well with heat. But I did always wish I could get a light glow, especially around the holidays. I see all my family during this time, and I know if I had a light glow it would make me look healthier. This is the most pale I've ever been, and while I have gotten compliments on how beautiful my porcelain skin is, it's still nice to have a change.

Some other things you should know about me is that prior to hiding from the sun due to illness I was always tan. My skin tans easily in the sun and it holds the tan for a long time. In high school I began getting spray tans in the winter to hold me over, and I never used tanning beds. I'm actually pretty well versed in spray tans & self tanners and have a lot of experience with them in the past. However, my skin hasn't seen more than 5 minutes of sun in YEARS, and I am extremely pale. This means that I'm starting from a shade of pale where the lightest tone of foundation matches me perfectly. Here are some photos ...
Pre-Tan Photos
My norm color/tan in years prior
Picture
Sometime in 2014 (I think)?
Picture
When I chopped my hair to donate.. oh so pale!

Beauty by Earth Organic Self Tanner Review (lady of lyme)
#1 - Beauty By Earth: Organic Self Tanner

This is the first item I bought and based on the reviews I was so excited to try it. I had been away from the self tanner game for quite some time and I was jazzed to find something like this product on the market. For one, it is full of only organic natural ingredients, and looked really pure. Every single ingredient is naturally derived, and it's pretty much a simple lotion of coconut oil, aloe, DHA (from sugar) and a few other ingredients. When it arrived I opened up the bottle and took a sniff. It smelled like coconuts, and was soooo delicious. It wasn't fake coconut either, it was a light and pleasant coconut oil scent but not overpowering at all. If you do OK with the smell of plain ole coconut oil then you will do great with this scent wise. I had no MCS type reactions to this at all while applying or during the developing.

I woke up on the day of the trail, showered, exfoliated, put lotion on rough areas and then got to work with my tanning mitt. My first issue right off the bat was that this lotion goes on clear so I had no idea how even it would or wouldn't be. There is no good way to see streaks or thicker areas so you can fix them before they develop. I used a tanning mitt and although this helped greatly it was still a much longer process to rub it all in than necessary. It soaked up quick on the skin so I had to keep reapplying over and over. By the time I finished I was exhausted and plopped back in bed. The developing time on this is 6-8 hours and by about the 3 hour mark that classic "tanning smell" of DHA began to become noticeable. By hour 4 it was down right obnoxious. I planned to keep it on for 6 hours but only made it to 5 and a half because that awful tanner smell was making me nauseous. I hopped in the shower, used body wash twice, and afterwards put some lavender body lotion on. This helped to mask the smell, but since the tan continues to develop for hours (even after the lotion is washed off), the dreaded smell was back not too long after. I realized I would have to stick it out and wash it off tomorrow when the processing was done. I slept terribly that night, reapplying lavender oil lotion 4x to try and mask the smell as much as possible.

Beauty by Earth Organic Self Tanner Review (lady of lyme)
I woke up the next day and boy oh boy did my tan develop..I was a splotchy mess. Since I didn't have any color to guide me I had missed spots and left streaks all over my arms. I had areas that I accidentally applied thicker layers to, so parts of my arm had darker colored splotches. To top it all off one arm was noticeably darker than the other. Oh, and I also still smelled terrible. I could hardly wait to hop in the shower and do a deep scrub. I had to scrub hard to even things out, but once I got out of the shower it looked OK. It wasn't orange, it evened out so/so, plus the smell was gone. But the work it took to get to this point was just way too much. Especially if you have a chronic illness and/or sensitivity to smells. I do not have the kind of energy needed for 3 showers, 2 deep scrubs, and 1 incredibly long session to apply it (plus the headache from the developing smell). There is no way I could do this weekly or really even monthly, plus it wasn't worth it. The color lasted about 4-5 days and was a bit more orange while fading than I would like. However, props for it not transferring anything onto my white sheets. That was a real bonus. I did try this again a second time and tried washing it off at hour 4 to see if its any better... it's not. The self tanner smell is just as pungent and I was just as streaky (until I exfoliated for a solid 10 minutes). I only WISH I had photos to show, but sadly I uploaded them for an Amazon review and deleted them off my phone since I hardly have any space left on it, and the Amazon review didn't post. Sooo, I lost them. I was counting on you Amazon, and you failed me! I will however link to a review photo here which looked exactly how I did. So, to recap Beauty By Earth:

Pros:
  • No added fragrance, just has a light coconut oil smell
  • All organic and natural ingredients, none of which I had an allergic reaction to or any issues with MCS
  • Pretty moisturizing to the skin
  • The tan did not transfer onto my white sheets or my clothes

Cons:
  • Self tanner developing smell is so strong and pretty awful for a solid 12-18 hours after application, even after being washed off.
  • The lotion applies clear and therefore it's hard to make sure it doesn't apply streaky. Even with me being well versed in tanning lotions I still struggled a lot
  • Takes a lot of time to apply because it goes on clear and soaks in the skin fast I had to keep reapplying and I was exhausted 15 minutes later.
  • Takes a lot of exfoliating the following day to even out the tan
  • Color only lasts about 4-5 days
  • Can be a bit more on the orange side
  • It did tint my white towels a bit brown/orange the following day post shower
  • Calls for 3 showers: 1 to pre-exfoliate, 1 to rinse off smell, 1 long one the next day to exfoliate off streaks.

You can check out the full product listing here

St. Tropez Express Tan Mousse Review (lady of lyme)
#2 - St. Tropez Express 1 Hour Bronzing Mousse

Okay so let me say right off the bat that this is NOT fragrance free. But let me explain why I tried it. The bottle advertises that it has a "patented" smell blocker, which tricks the olfactory senses into not smelling that dreaded self tanner smell. The reviews said it had no self tanner smell and was very pleasant. Granted, I am judging on normal peoples noses, not someone sensitive like myself. I knew it had some unsavory ingredients in it too, but what really sold me was the "express" tan aspect. You only have to leave it on for 1 hour, and I thought that the smell blocker would just mean I smelled absolutely nothing. But.. yeah, that is not the case at all.

So just like before I woke up, did a good scrub, put on lotion in my rough spots etc and got to work. The St. Tropez foam is tinted so you can see where it's going, however the fragrance smell was so intense! I mean, this stuff was floral scented in such a strong way that I got an instant headache and my heart started pounding out of my chest by 20 seconds in. However, I had already applied it to my entire left arm so I committed. I thought it would fade and I would be fine. Let me tell you, I seriously struggled to get it on just my arms and chest. I stopped there and laid down in bed because my heart was jumping out of my chest. My plan was to make it to 1 hour so I laid down, took Benadryl, and listened to calming music all while still wearing my Cambridge mask. While the mask helped a great deal, it could not prevent this insanely strong perfume fragrance from coming through. I laid flat on my back and my heart raced at 120 the entire time. I made it to the 1 hour mark and washed it off twice, all while gasping for air. It was awful. I had a full blown migraine afterwards and I felt miserable for 2 days afterwards. I knew in that moment I would never put myself through that ever again.

St. Tropez Express Tan Mousse Review (lady of lyme)
After leaving the St. Tropez on for 1 Hour
I assessed things the next day and realized that 1 hour is almost useless. I mean, I am so pale and even for me it barely did anything in terms of giving me a color. I concluded that it would need to be left on for at least 2 or perhaps all 3 hours in order to achieve a glow that is worth it. However, the color tan it gave was a true brownish tan and had no orange tones at all. I only had a medium level self tanner smell which I was thankful for, and it was not streaky. I put it on in a rush but even then I had 0 streak and it went on pretty even. So, let's recap the St. Tropez Express Tan:

Pros:
  • Tinted mousse so it's easy to see where it's going
  • Applies well and you don't need a lot for it to easily glide on
  • Did not streak
  • Did not have an orange tone color
  • Did not have a bad dreaded tan smell. It was there, but it was tolerable
  • Tan did not transfer onto my white sheets or clothes.

Cons:
  • Absolutely not MCS friendly. It has a harsh fragrance smell that made me sick for 2 days
  • The fragrance is hard to wash off in the shower
  • Called for about 4 showers. 1 to pre-exfoliate, 1 to rinse off, 1 more to get smell off, and one the next day to get lingering fragrance off.
  • 1 hour isn't useful although that's how it is advertised
  • Absolutely not allergy friendly. I got a few skin itchy rashes from it
  • With the 1 hour develop the color lasted barely 3 days

You can check out the full product listing here

Vita Liberata 10 Minute Tan Review (lady of lyme)
#3: Vita Liberata 10 Minute Tan

I learned my lesson after that disaster and I went back to the drawing board. I now knew more of what I wanted and what I was looking for in a self tanner. It became obvious that the self tanner developing smell was going to be a point of contention for me. It also became obvious that the shorter the time it took, the better. This is when I stumbled upon the 10 Minute Tan. It toots things like only needing 10-20 minutes on before you can wash it off, to having no added fragrance, to using only organic ingredients. To my lovely surprise when it arrived I took a sniff and it indeed did not really have much of a smell. It has some essential oils so it had a light citrus scent with a tiny hint of self tanner. But it was super mild and tolerable.

The 10 Minute Tan is a non-toxic organic cream that is free of parabens, perfume, alcohol and harsh chemicals.
I was very ready to give this a try! So I hopped in the shower, exfoliated, put on lotion on my palms, knuckles etc, and got to work with my tanning mitt. This lotion is tinted, which makes it super easy to apply and avoid streaks. It also has a smooth consistency that goes on like a dream, and doesn't soak into the skin too quickly. Application was a breeze, it took max 3-4 minutes and had no bad smell! I had no MCS reaction at all, and no issues in the scent department what so ever. I laid down in bed and waited 30 minutes then rinsed off in the shower. As the color continued to develop I had a slight self tanner smell, but it was very faint. This had the lightest self tanner smell out of all the options I had tried to this point which was a big win.

Vita Liberata 10 Minute Tan Review (lady of lyme)
Pre-application & the day after
The next day I checked out my results and loved what I saw. The color developed beautifully in a natural brown tan color with 0 streaks. It went on evenly all over and looked natural. I got quite a few shades darker, and compared to Option #1 the self tanner smell wasn't nearly as bad. I did however still have to shower again when I woke up because the self tanner smell amplified a bit during the night. It really isn't very strong or bothersome, but it was enough to where I felt like a shower was needed. This was the most pain-free of all the options I tried to this point in terms of it taking the least energy and coming out the nicest. It didn't need a long scrub and shower the next day to even it out, which I appreciated. It didn't exhaust me nearly as much as the others, and the color lasted almost a week. I loved the idea that I could do this a few days before the holidays and have that glow last me all the way through. By now I had declared that this was my absolutely favorite of them all, and I contemplated stopping here... but as you see I still tested out more. Let's recap the 10 Minute Tan:

Pros:
  • No MCS reaction because there is no added fragrance
  • It has some essential oils which gave off a very light citrus scent that is soothing
  • Is tinted so I could see exactly where I applied it
  • Applied very smooth and fast
  • No allergic reaction upon application or while developing
  • No harsh nauseating self tanner smell while developing
  • It only has to stay on the skin for 10-30 mins
  • Creates an even non streaky color
  • Creates a brown tan with no orange tones at all
  • Tan lasts about a week
  • Tan did not transfer on to my white sheets or clothes

Cons:
  • Still needs 3 showers. 1 pre shower exfoliation, 1 rinse off, 1 shower next day to clean off rididual self tanner smell

You can check out the full product listing here

Vita Liberata 2-3 Week Mousse Review (Lady of Lyme)
#4: Vita Liberata Phenomenal 2-3 Week Mousse (Dark)

After I had such a great experience with the 10 minute tan, I got curious about other Vita Liberata products. As I began to research I found that their most popular product is the Phenomenal 2-3 Week Tan Mousse. Fun fact, this is what the Victoria's Secret models use (I learned that as I researched). I saw the product and instantly was intrigued by the 2-3 week wear. If I could have my tan last double or triple the time of other self tanners then I could do one application mid December and be set till the New Year. That is music to the ears of someone with a chronic illness. Minimal effort, maximum results. The 2-3 week Mousse also contains organic ingredients & also is devoid of any fragrance. It does however toot an 'odor removing technology' to block the stinky self tanner developing scent, but according to reviewers it is completely scentless.  Now THAT is my kind of smell blocker!

When the Mousse arrived I took it out of the box and immediately did a preemptive smell test. And guess what? No smell!! It has the most mild hint of self tanner smell but even my sensitive nose could hardly detect it. I was so excited to give it a go the next day.

I got up the next day & did the usual song and dance of showering, exfoliating and applying lotion to rough spots. I then got my tanning mitt & got to work. The Mousse is tinted and makes it super easy to see where it's being applied. It glides on very easily (the most easily of them all) not soaking in too quickly so I had time to work it in without being rushed. I have to stress this, because I still am flabbergasted by it, but it had no smell!! I applied it all over, even up my neck and chest, and I smelled nothing. This smell blocker of theirs is a dream. It was super quick to apply, dried within 5 minutes and didn't rub off on my clothes or sheets. This also was the most tinted of all, and when I finished I already had a bronze all over. So if you want something which can give instant color, this is a winner.

The instructions say to leave the Mousse on for 4-8 hours before washing off. It also says at this point it can be reapplied for a second layer to make it darker, but I opted not to do that. My plan was to wash it off at the 8 hour mark, but honestly I just went to bed instead. The reason for this is because it had 0 bad smell, and there was no real need for a rinse off or shower ASAP. The others either 1. had a strong self tanner smell so I had to shower 2. had a fragrance smell so I had to shower, or 3. called for it to be rinsed off (ie. the 10 minute tan). With this, I had no obligation to do so which was great. When I went to bed I looked pretty dark from the bronzer + developing tan and figured I would assess in the morning.

Picture
Vita Liberata 2-3 Week Mousse Review (Lady of Lyme)
Pre application & the day after (post shower)
​The next day I got up and took my time getting to the shower. I still barely had a self tanner smell at all (no joke!). But I was splotchy from the tinted bronzer and I knew I needed to wash it all off to see what had developed. I will say, when I showered I did lose some color. The tinted bronzer was a bit deceiving because it made me feel like I was way darker than I actually was. Post wash off I was still tan, but much less than it showed. I guess the tint is a blessing and a curse in that regard. I can see now why they recommend a second application to really cement in the color for the 2-3 weeks. For my use though it was still great since I only wanted to achieve a light glow.

Although I was slightly let down by the color at first I otherwise could not be more impressed with this product. Out of everything this had the absolute least smell. There is no fragrance in the product and the smell blocking technology meant I smelled virtually no self tanner smell. Even on Day 2 it was so mild. To top it off I also didn't have to shower until the next day, which means it only took 2 showers, not 3 like the others. This truly is the epitome of something you put on and forget about, which makes it highly convenient for a chronic illness. The wear on this was about 10 days. I suspect if I had done the double initial application that it would have gone 2 weeks or more. Next time that's what I will try out! Let's recap the 2-3 Week Mousse:

Pros:
  • No MCS reaction because of 0 added fragrance (and no real smell to the mousse itself)
  • Almost no self-tanner smell, even on developing day 2
  • No allergic reactions on the skin
  • Tinted mousse so I could see where I was applying
  • Very quick to apply and goes on smoothly
  • Creates an even non streaky color
  • Develops into a nice brown tone, not orangey
  • Only needed 2 showers
  • Did not stain white sheets or towels
  • Tan lasts about 10 days (and faded evenly)
  • I could put the tan on and forget about it until the next day

Cons: 
  • Bit more pricey than the rest

You can check out the full product listing here

St. Tropez In Shower Lotion Review
#5: St. Tropez In Shower Lotion Self Tanner (Medium)

I know I know, I had already been burned by St. Tropez before so why did I try another product? Well, it's because I'm a girl on a mission for convenience and ease. And this product promises to make you tan by simply putting it on in the shower (while wet), and rinsing it off after 3 minutes. That's it! My interest was peaked, and the photos of the before and after looked pretty darn good. The thought of doing this when I shower and not having to do anything extra was very appealing to me, and so I gave it a whirl.

This time however, I came prepared. I grabbed my Cambridge mask and carefully smelled the product before application. And guess what? It smelled awful. It had such a strong perfume/floral scent that as soon as I opened it up I started coughing. I honestly do not know why on earth anyone would need to put that strong of a fragrance into a body wash, but alas, they did.

So once I smelled it and reacted I stopped there. I didn't suscept myself to actually applying it and going through another 2 day migraine. I can't attest to what it did or didn't do, but on smell alone it was a big ole swing and a miss in my book.

St. Tropez In Shower Lotion Review
You can check out the full product listing here

Summary:

In summary, the 10 Minute Tan & The 2-3 Week Mousse from Vita Liberata were my top favorites. I love them both for differing reasons. I think the 10 Minute Tan gave me an initial darker color, but it didn't last as long. And the Mousse didn't get as dark with just 1 application, but it lasted longer overall. The Mousse probably still has an edge because of the smell blocking technology that gave me the least self tanner smell of them all. The convenience of both of these products are pretty great, but the real joy is their lack of smell. To find something that doesn't trigger my MCS and doesn't make me nauseous while it develops is such a huge win. I will likely be using the mousse during the holidays with the initial double application, and although that will require 3 showers, if it lasts me close to 3 weeks it will totally be worth it!

0 Comments

    Welcome!

    This is the area of my blog devoted to Reviews of books, items, supplements etc, as well as Interviews with people in the Lyme Disease community.
    NONE of the posts are sponsored, and ALL items discussed are bought and paid for myself unless noted otherwise in the post. You will also find some wonderful Guest Posts by incredible writers in the Chronic Illness community.


    Lauren's Hope Medical ID

    Archives

    April 2022
    May 2020
    February 2020
    January 2019
    September 2018
    July 2018
    April 2018
    March 2018
    January 2018
    November 2017
    September 2017
    February 2017

    Categories

    All
    Book Reviews
    Product Reviews

    RSS Feed

© 2011 Lady of Lyme™. All Rights Reserved.

Terms and Conditions  - Privacy Policy
Connect with me:
Facebook
Twitter
Contact   About   Email Me


Lady of Lyme is a participant in the Amazon Services LLC Associates Program, an affiliate advertising program designed to provide a means for sites to earn advertising fees by advertising and linking to amazon.com.